Wednesday, February 24, 2010

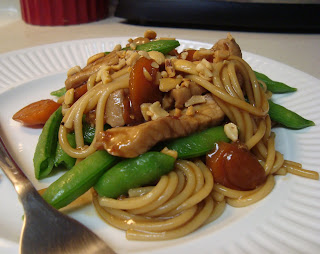
Pork Lo Mein

This tastes just like we were eating at a Chinese Restaurant... which makes my hubby happy! This is sure to become a family favorite. It is quick and the flavors are amazing. With all your veggies, meat and noodles combined you can have a big bowl of this and still feel great. You can't go wrong with this easy dish!


Ingredients:

2-4 pork chops
1/4 cup soy sauce
3 cloves garlic, minced
1/4 teaspoon ground ginger
1/4 teaspoon crushed red pepper flakes (if you want)
2 cups fresh snow peas
1 medium red pepper, sliced
2 medium carrots, diced and steamed about 5 minutes
3 cups cooked thin spaghetti
1 tablespoon cornstarch mixed with 1/3 cup chicken broth
chopped peanuts or cashews

1. Cut your pork in to 1/4 inch slices. Set aside. In a large resealable bag combine the soy sauce, garlic, ginger, and pepper flakes. Add in the pork. Seal the bag and turn to coat. Refrigerate for 20 minutes.
2. Next about 10 minutes into the marinating time get a big pot of water boiling and cook those noodles. Steam the carrots too. Then when everything else is ready you can add this stuff in.
3.Coat a large non-stick skillet or wok with cooking spray. Stir fry pork and marinade at med-high heat until no longer pink. About 4-5 minutes. Add the peas, red pepper and carrots. Stir fry for another minute. Add in broth and let it thicken over heat. When it is thick, toss in noodles and cook for 1 minute. Remove from heat and fill bowls full and top with chopped nuts!!

* This dish has 343 calories per serving! Nice huh? If you want more veggies, add a side of steamed broccoli and you are set!

Sunday, February 21, 2010

Oreo truffels

Ok, this seriously couldn't get any easier!! It is fast and looks so fancy, anyone can do it!! You can whip this up for your sweetheart, friends, or for yourself! I lightened it up too, so you can have a few!


Ingredients:

1 8 oz. package fat free cream cheese
1 package reduced fat oreos
1 cup white chocolate melties (you can get them at walmart or winco)

* When I made these I halfed the recipe and it still made about 20 or so. So you can make a lot or a little, whatever you want!

1. Take your cream cheese out of the fridge and bring to room temperature (about an hour). Next, break your oreos in half and toss them in your food processor or into a big zip lock bag and crush those babies until they are super fine.
2. In a medium bowl with a hand mixer, blend the cream cheese by itself to get it nice and soft. Once it is creamy add the crushed oreos. After it is all combined take about a tablespoon sized ball of mixture and roll it into a ball and set aside. *Just to let you know, it is a pretty sticky mixture and it's not a clean process. I washed my hands about every 5-6 balls. I didn't try this but you can probably spray your hands with a little non-stick spray and it will work wonders! Repeat until you have made all your truffles (I put mine on a flat plate).
3. In another bowl, melt your white chocolate in the microwave for 30 seconds at a time. Stirring after each time. Once it is melted it is time to dip! Lay out a piece of wax paper to put your finished truffles on.
4. Using two spoons or whatever works best for you, dip and toss your oreo balls in the chocolate. Place on paper and sprinkle with well..... sprinkles. Decorate them how ever you want and within minutes you have a yummy treat!!

* You can dip these in chocolate or dark chocolate too, extra sweet!!

Wednesday, February 17, 2010

Garlic Chicken and Articoke Pizza

About 2 years ago we went to visit my sister in-law in Redmond and we had the most amazing pizza!! It was sooo good, but you know how you can just tell by looking at it you are about to gain 3 lbs? Well, I have recreated it in a much lighter and healthier version, without sacrificing the delicious flavors!


Ingredients:

Pizza crust (I use this one or you can use your own or a refrigerated crust)
1 package McCormick Alfredo sauce mix
1/2 cup fat free milk
1 tablespoon tub butter (I use Brummel and brown butter, it is made with yogurt)
1 can artichoke hearts(in water)
2 chicken breasts, thawed
garlic powder
mozzarella cheese
olives
salt and pepper

1. Season your chicken with salt, pepper, and garlic powder. You want to have garlicy (is that a word?) chicken. It just really makes this pizza great! Cook your chicken over medium heat until done. Set aside.
2. Time to make your sauce. Take your package of Alfredo mix and whisk it into milk over med/high heat. Add butter. Add a about 1/4 teaspoon garlic powder too:) You want it to be nice and thick. After it has all come together, let it cook for just a minute or two over the heat then take off and let cool. It will become thicker as it cools.
3.Drain your artichokes and chop into bite size. Slice your olives too, it you want them. Shred your cooled chicken and grate your cheese.
4. Lets assemble! Ok, on your ready crust (some crusts want you to cook for a few minuets before topping so make sure you are at that step) spoon your sauce and spread around to edges. Next top with artichokes, chicken and olives. Last sprinkle your cheese on top. Sprinkle top of pizza with bit of dried oregano.
5. Bake for 10-12 minutes in a 425 oven. It is so good you won't be able to believe it until you taste this pizza!! Add a side salad and dinner is served!

Thursday, February 11, 2010

Mini Stuffed Frittats

Yum! I love breakfast for dinner and this cooked up in no time. This is a light and healthy dinner that my husband loved too!! The girls liked the bit size dinner as well! It looks fancy, but is super easy.


Ingredients:

(This recipe made 24 mini muffin sized egg frittats)

1/2 lb. turkey breakfast sausage, cooked, crumbled and cooled.
5 eggs whites and 1 whole egg, beat together
1 tomato, seeded and diced
1/3 cup grated mozzarella cheese (or whatever cheese you like)
3-4 tablespoons chopped fresh cilantro
a splash of low fat milk or fat free half and half (for added fluffiness)
salt and pepper

1. Beat your eggs together in a medium size bowl. Add in your cooled sausage, tomatoes, cheese and cilantro, milk and salt and pepper.
2. Grease your mini muffin tins with non-stick spray. Fill each well almost full of egg mixture.
3. Put into a pre-heated 375 oven for 9-11 minutes, until eggs are set.
That's it!! Serve with muffins, apple slices, toast, fruit salad, baked potato wedges, smoothies, hash browns....anything breakfast and you are all set!!

* Because the eggs are mostly whites they are super good for you, lots of protein. And by adding one yoke, no one will ever know.... :)

Sunday, February 7, 2010

Fresh Fruit Trifle

This dessert is always requested by my husband, as it was this time too! It is one of his favorites! It is fast, pretty, and easy and the best part is you can choose which fruit you want to put in it. Light and healthy (for a dessert:) and you can't mess this one up!


1 box white cake mix (egg whites, applesauce, and water as it calls for it)
1 box of vanilla fat free/sugar free pudding
1 tub fat free cool whip (2 containers if you love cool whip)
fruit of your choice: I used strawberries, kiwi, bananas, blueberries, and peaches

1. Ok, so easy!! Mix and bake your cake in a 9x13 pan. Let it cool all the way. While it is cooling mix together your pudding and slice your fruit. Make nice even slices so it looks pretty. Make sure your cool whip is thawed all the way too!! Put it in the fridge the night before of at least 3 hours before you make this (like in the morning).
2. Next, cut your cake into little cubes. Run your knife through the pan making bit size cake cubes. Time to layer.
3.Place enough cake cubes on the bottom of your trifle dish or glass bowl to cover completely. Next spoon half of your pudding on top of cubes. Place some of your pretty fruit on the sides of your dish. Just press them gently. Put about half of your fruit on the pudding. Then cool whip on top of the fruit. Repeat. Cake. Pudding. Fruit. Cool whip to finish. Beautiful!! The longer in the fridge the better the flavors will blend. Enjoy!

* Just so you know..... If you are going to make this then serve it later don't put the last bit of cool whip on top until right before serving. You NEED to cover this dessert and the Saran wrap will stick to the cool whip. If you put on the cool whip and don't cover it in the fridge, the cool whip will kinda dry out and be hard.

Tuesday, February 2, 2010

Chicken Taquitos

These definitely took me back to the good old days of being a newlywed and working at Gringos. :) They were really good and really crispy without frying. The oven toasted them perfectly and we ate them right up! I can't take credit for thinking these up, they came from Our Best Bites. Try them, you will love them!


Ingredients:
1/3 cup (3 oz) low fat cream cheese
1/4 cup green salsa
1 tablespoon fresh lime juice
1/2 teaspoon cumin
1 teaspoon chili powder
1/2 teaspoon onion powder
1/4 teaspoon granulated garlic, or garlic powder
3 tablespoon chopped cilantro
2 tablespoon sliced green onions
2 cups shredded cooked chicken
1 cup grated pepperjack cheese (i used Colby)

small corn tortillas (and actually, flour ones are really good as well)
kosher salt
cooking spray

1. Heat oven to 425. Line a baking sheet with foil and lightly coat with cooking spray.

2. Heat cream cheese in the microwave for about 20-30 seconds so it's soft and easy to stir. Add green salsa, lime juice, cumin, chili powder, onion powder and granulated garlic. Stir to combine and then add cilantro and green onions. Add chicken and cheese and combine well.

(You can prepare up to this step ahead of time. Just keep the mixture in the fridge.)

3. Work with a few tortillas at a time and heat in the microwave until they are soft enough to roll without cracking. It helps to place them between damp paper towels. Usually 20-30 seconds will do it. If you find yours are cracking when you roll them or are coming unrolled right away, just try heating them longer and try the paper towel thing.

4. Place 2-3 tablespoons of chicken mixture on the lower third of a tortilla, keeping it about 1/2 inch from the edges. Then roll it up as tight as you can. Place seam side down on the baking sheet. Lay all of the taquitos on the baking sheet and make sure they are not touching each other. Spray the tops lightly with cooking spray and sprinkle some kosher salt on top.

5. Place pan in oven and bake for 15-20 minutes or until crisp and the ends start to get golden brown.

* Make some guacamole and dip in sour cream,so good!
* Add a side salad and you are set! Really good for you too!!