My sister gave me an awesome cook book full of super low fat recipes and this is one of them! Yum, I love artichokes, and sweet sausage, and pasta..... So this dinner was perfect! It all comes together really quick too! Sure to fix a pasta craving any night!
Ingredients:
1/2 lb. sweet turkey sausage
8 oz. short pasta
3 medium tomatoes, diced
1 medium onion, diced
1 cup slices fresh mushrooms
3 cloves of garlic, minced
1 tablespoon dried basil
1 tablespoon dried oregano
1/8 teaspoon cayenne
1/4 teaspoon pepper
1 can artichoke hearts, drained and quartered
2 tablespoons lemon juice
fresh parmesan cheese
1. Start by boiling a big pot of water. When your water is boiling toss in some salt and the pasta. Cook pasta 9-11 minutes or until al dente.
2.While your pasta is cooking, lets get working on the sauce. Start by cooking your turkey sausage in a non-stick skillet over medium-high heat. When the meat is cooked through add in the tomatoes, onion, mushrooms, garlic, basil, oregano, cayenne, and black pepper. Stir everything together and cover. Cook 10-12 minutes, until tomatoes are soft.
3. Add the artichoke hearts and lemon juice to the skillet. Cook until everything is heated through. When the pasta is done cooking add the pasta into the skillet. Sprinkle with 1/4-1/2 parmesam cheese and toss is all together. Add a bit of pasta water to make a nice sauce..... yum!
4. Plate your pasta and enjoy.
* serve this dish with a crisp green salad, fresh fruit, and garlic bread!
Tuesday, July 26, 2011
Thursday, July 21, 2011
S'mores Brownies
I am totally obsessed with making "s'mores" desserts right now....it must be summer. Anyway, these brownies were SO good that I am pretty sure I ate most of them myself (sorry Rex). All the fixings of a s'more, layered into a brownie, YUM!
Ingredients:
1/2 cup applesauce
1 cup sugar
1 teaspoon vanilla extract
3 egg whites
1/2 cup flour or whole wheat pastry flour
1/3 cup cocoa
1/4 teaspoon baking powder
1/4 teaspoon salt
2 graham crackers, broken into small pieces
mini marshmallows
2 cups chocolate chips
1/2 cup fat free half and half
Yum.... what a wonderful combonation
1. First mix your brownies together by mixing your applesuace, sugar, and vanilla together. Next, add your egg whites. Beat them in and then add your cocoa, flour, baking powder, and salt. Mix until everything is combined. Pour into your greased 9x9 pan and bake at 350 for about 20-25 minutes, until a toothpick comes out clean.
2. Then comes the good part. Right after you pull the brownies out of the oven take about 1 cup of chocolate chips and sprinkle them evenly over the top. Let them get shiny then spread them with a knife to make a nice frosting. Next, sprinkle your graham craker pieces over the melted chocolate. You want them to cover the top. Ok, here is the marshmallow part. Sprinkle your graham crackers with mini marshmallows. Probably a couple handfulls will get the job done. (I didn't really keep track, just kept tossing them on there until they covered the top). Crank your oven up to broil and pop the pan back in for about 1 minute. KEEP YOUR EYE ON THEM. These brown up fast so watch them. They can quickly go from golden brown to burnt. Believe me I know :)
Pretty huh... wait, your not done yet!
3. Give your brownies about 15- 20 minutes to cool a bit. But while you are waiting make your frosting. In a small saucepan combine one cup of chocolate chips and 1/2 cup of fat free half and half and melt over medium low heat. Stir with a wisk until smooth. (If it seems to thick add a little more half and half.)
4. Carefully pour the melted chocolate over the marshmallows making an even layer. You can use a knife to spread it to the edges so there are no gaps. Let chocolate cool before cutting, about 30 minutes. For faster cooling put them in the fridge.
Cut a big square, pour a glass of milk, and enjoy!
Sunday, July 17, 2011
Enchilada Skillet
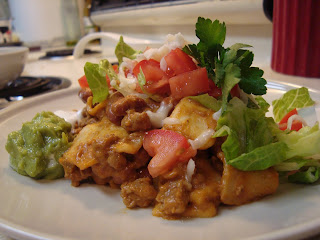
I love creating recipes and this just so happens to be one! We love Mexican food....warm, saucy and spicy. Oh yum, takes me back to me waitressing days at good old Gringos :) Anywhoo, this meal was a hit, I love the tortillas mixed right in and the fresh veggies on top!
Ingredients:
1 lb. ground turkey
1 packet taco seasoning
1 can pinto beans
1/2 can enchilada sauce (10 oz. size)
1 cup chicken stock or chicken broth
2 tablespoons fat free sour cream
2 low fat flour tortillas, cut into 2 inch squares
chopped lettuce
chopped tomato
grated cheese
fat free sour cream
guacamole
1. Start by cooking your ground turkey. After it is mostly cooked through season your meat with your taco seasonings. Add a bit of water to really incorporate the seasoning in. Ok, next toss in those beans, enchilada sauce, and sour cream. Stir to combine.
2.Next add a little bit of chicken stock at a time so your mixture remains creamy, not runny. You might not use the whole cup of liquid. Next, add in your tortillas. I love this part. I love warm, soft tortillas and covered in enchilada sauce... ah yes please! Stir those babies in nice and good, get them covered! Let that cook up for a couple minutes so the tortillas are soft. If you want, add a bit more stock if you want it thinner, I just happen to like thick creamy sauce.
3. Ok, time to plate! Give everyone a nice big scoop, top with lettuce, tomatoes, cheese and sour creams and guacamole! Oh, I can't wait to make this again!
* If you want add corn, olives, green chilies... Serve this meal with fresh watermelon, a green salad, or rice.
* Leave out the ground turkey for a great vegetarian meal!
Thursday, July 14, 2011
Teriyaki Ginger Marinade
This is a great marinade that goes perfect with any grilling that you want to do this summer! Try this with chicken, beef or pork. The trick with this marinade is to let your meat marinade over night, the flavors are amazing!
Ingredients:
1/2 cup soy sauce
1/2 cup water
1/2 cup brown sugar
1 tablespoon fresh minced ginger
1 tablespoon minced garlic
2 tablespoons chopped green onion
1. Combine all the ingredients in a bowl. Put your choice of meat in and allow 2-12hours to marinade.
2. Grill and enjoy!!
* Pair up your main dish with any of these: sweet potato fries, fresh green salad, watermelon, corn on the cob, fruit salad, muffins, french bread or rolls.
* Fresh ginger is so important in this marinade, but your probably wondering what to do with the left over piece of ginger huh? Well, put it in a zip lock bag, squeeze all the air out and place it in the freezer. It will stay fresh for a couple months in there. Plenty of time to make more teriyaki ginger marinade!!
Wednesday, July 6, 2011
Chocoalte Raspberry Layerd Cake
I love this blog. I love food. I love cooking and baking. Why do I feel like I don't have enough time in the day to post then??? Oh yeah.... this is why.... :)
(all decked out in 4th of July attire)
I love my girls. I feel so lucky that I get to stay home and cook and play with my girls. But time slips away and before you know it, it is 11:30 p.m. and I haven't even turned on the computer all day! I PROMISE that I will be posting at least 2 times a week now that we are on a better schedule and Olivia is more settled. AND, I have a ton of pictures ready to be posted.... so there you go! Whoo hoo!
Ok, on to one of the best cakes ever! Rex requests this cake every time I ask him what he wants for dessert. Usually I find so wonderful chocolate creation and make it before I even ask him if it sounds good.... He is so good to put up with me :) This cake is amazing. And easy too! I cut a TON of fat and calories out so cut a big slice and enjoy!
Ingredients:
1 devil's food cake mix
egg whites, applesauce, water
1 8 oz. package low fat cream cheese, softened
1/3 cup white chocolate chips, melted and cooled a bit
1 tub fat free cool whip, thawed
1 cup seedless raspberry jam
1 cup semi-sweet chocolate chips
1/2 cup fat-free half and half
1. Prepare the cake as directed substituting the applesauce for oil and egg whites for eggs. Pour into two 9 inch pans that have been sprayed with non stick spray. Bake as directed. Let the cakes cool in the pans. When they are cool, carefully remove them and wrap them tightly in plastic wrap and freeze for an hour.
2. Beat the cream cheese in a large bowl with electric mixer and until creamy. Add the melted white chocolate and mix well. Next with a whisk, gently stir in 3/4 of the tub of cool whip. If your mixture seems lumpy that is ok. I probably means that the cool whip was cold and the melted white chips cooled quickly in the mixture. Don't worry, it won't effect the filling or flavor at all. It will be perfect.
3. Ok, lets assemble this cake! Carefully cut your cakes horizontally in half with a long sharp knife. I used my bread knife. You will have 4 layers. Make sure to trim all the layers to be the same thickness. Place 1 layer on a plate or cake stand. Spread it with 1/3 cup of jam. Then carefully spread 1/3 of the cool whip mixture on top of the jam. Take your time and spread it evenly. Repeat the cake, jam, cool whip layers 2 more times and top your cake with the last layer of cake.
4. In a sauce pan on the stove, melt your chocolate chips and half and half together until smooth and creamy. You want it to be pourable, so add a bit more liquid if you need to. Ok, pour that yummy sauce all over the top and allow a bit to drip down the sides too. Oh yum......Let your cake set for an hour or two so the flavors really come together. ENJOY!
Subscribe to:
Posts (Atom)