Sunday, July 15, 2012

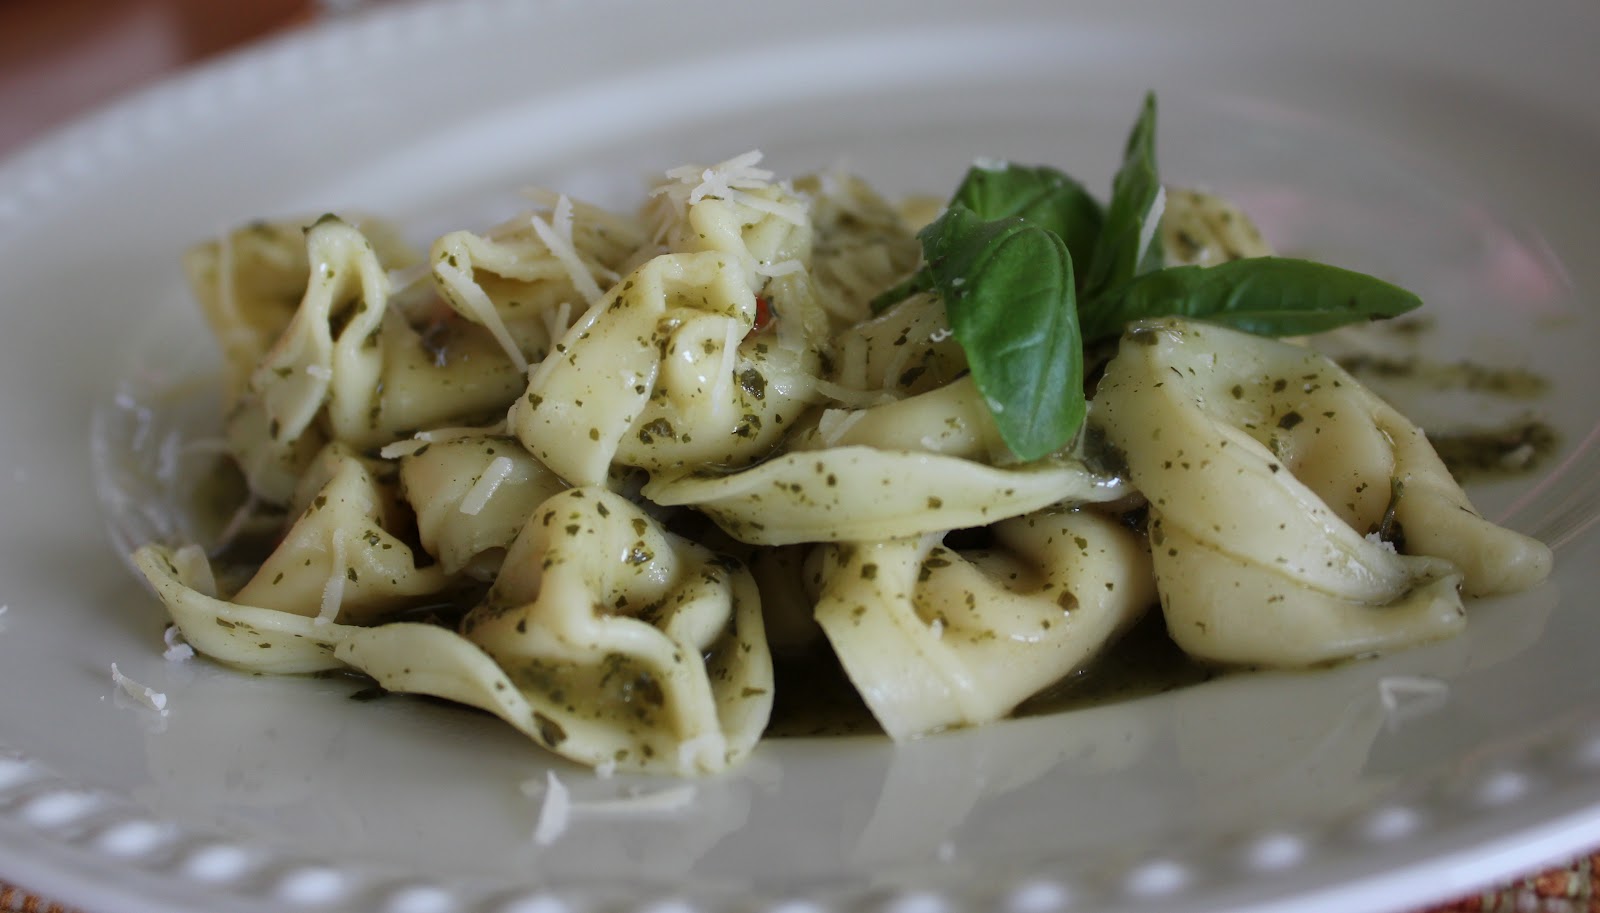
Pesto Tortellini

This is a great fresh summer dish.  Only three ingredients! It is light, meat free, and you can't beat the clean herb flavor. This comes together quick with fresh pasta tortellini and is one of my favorite pasta dishes. Just add a colorful fruit salad and fresh tomatoes on the side and dinner is served!


Ingredients:

16 oz. package of fresh cheese filled tortellini (it is in the refrigerated section by the cheese)
1 package of Knnor brand pesto (it comes in a package by packaged taco seasoning and it is a dry mixture)
fresh Parmesan cheese

1. See, only three ingredients but tons of flavor. Ok, so first get your pasta cooking. Bring a pot of water to a boil and cook pasta according to package directions. Probably around 9-11 minutes. While the pasta is cooking make your pesto.
2. About pesto. You can certainly buy a container of already made pesto at your grocery store but I just make my own to control the fat and calorie content.
3.  I stray away from the back of the package directions. I pour the dry pesto into a small sauce pan. Then I add 2 tablespoons of low-fat Italian dressing (you can also use olive oil too). I turn the heat to medium and then add water a little bit at a time and stir your sauce using a whisk. By adding water a little bit at a time you can decided how thick or thin you want your sauce. So add water until you reach the consistency you like. Pesto has a strong but good herb flavor so it won't look like a lot but it will be....... don't worry :)
4. Before your drain your pasta, dip a measuring cup in the pasta water to save some of starchy water for later. Ok, now drain your pasta and return it back to the pot is was cooking. Now, pour your pesto over your tortellini and toss to coat. If your pasta seems a bit dry, just add a splash of the starchy pasta water.
5. Plate your pasta and grate fresh Parmesan cheese right on top.

Thursday, June 21, 2012

No Bake Candy Bars

I made these up one night with my girls because we were craving something sweet! They turned out sooooo good! They are sweet, salty, and crunchy. They are perfect for summer because there is no oven required. All of these ingredients you might even have in your kitchen, so whip some up tonight!


Ingredients:

graham crackers
25 caramels
2 tablespoons milk
mini marshmallows
pretzels, broken into small pieces
chocolate chips (I did a heaping cup)

1. This is a really easy treat. Start by lining your 8x8 pan with a piece of foil. Next make a layer of graham crackers to fit the bottom of your pan. I trimmed a couple of pieces with a serrated knife to make a perfect fit.
2. Unwrap all your caramels and put them in a microwave safe bowl. Add 2 tablespoon of milk and pop it in the microwave. Start with 30 seconds and give it a stir. Continue with 30 seconds at a time and stirring until it is smooth and creamy.
3. Pour HALF of the caramel over the crackers. Just drizzle it over. I doesn't have to be perfect, you are going to put lots of good stuff on top of it. Next, pour an even layer of mini marshmallows on the caramels. Kinda press them into the caramel. Yum. Ok next.
4. Pour (or drizzle for better coverage) the rest of the caramel over the marshmallows. Sprinkle an even layer of pretzels on top of the caramel and press them in too. Next and last.... melt the chocolate chips in a bowl (30 seconds at a time again until smooth) and pour the chocolate on top of the pretzels. Smooth out with a knife and set in the fridge until set.
5. When they are set, pull the foil out and cut into bars.

Thursday, June 14, 2012

Garlic Knots


We all know that I have an obsession with bread. Anything bread I love! I love making bread. I make fresh bread for my family a few times a week so we can have toast and sandwiches. Now my kids love bread. It is a vicious cycle really. But is it oh so good.

I also love making rolls, bread sticks, and tortillas for dinner. So these garlic knots were perfect for our pasta dinner the other night.

Now, this is a bread machine recipe. I love my bread machine. But I have a confession.....I use it only for dough making. It does all the work and makes no mess. I just dump everything in and in an hour my dough is ready for rising. Wonderful! Now if you don't have a bread machine then just use your favorite roll dough recipe or frozen rolls. Easy peasy.


Ingredients:

2 tablespoons soft butter
1 cup warm water
1 beaten egg
1/4 cup sugar
3 1/4 cup flour
1 teaspoon salt
3 teaspoons yeast
melted butter
garlic granules

1. Start by putting your soft butter in the bottom of the bread maker pan. In a measuring cup, beat your egg and add a little bit of the warm water while mixing. This will temper the egg. Add the rest of your water to the egg and add both to the pan.
2. Next, add your flour. I do a combination of all purpose and whole wheat but you can do whatever you like :) Just make sure it equals 3 1/4 cup. Add the sugar right on top. Then add salt and yeast. Pop in into your bread maker and press the DOUGH setting.
3. When it has finished rising in the pan, remove from pan and punch down. Roll it out and cut into strips. At this point if you are using your own dough or a frozen (now defrosted) do the same. Tie the strips into knots and place on a greased cookie sheet. Do the same for all your dough strips. Let rise for about 30 minutes.
4. Bake at 365 degrees for10-12 minutes until light golden brown. As soon as these come out of the oven brush them with butter ( I used melted tub butter) and sprinkle with garlic granules. Eat and enjoy!

Wednesday, June 6, 2012

Sweet Potato Casserole with Toasted Marshmallows

I know this may seem like a fall side dish, but this is my families favorite way to eat sweet potatoes. My kids gobble this up.....and then ask for seconds. It makes me so happy. There are like a million different versions of this dish out there but I have experimented and tweaked my own to make it perfect with a lot less sugar and fat in it. Tonight at dinner my husband told me that I got the proportions perfect.

Boo ya.

So, try it and I know you will love it!


Ingredients:

4 medium sweet potatoes (yams)
2 tablespoons tub butter (I use Brummel and Brown)
1/2 teaspoon salt
1/4 teaspoon cinnamon
3 tablespoons brown sugar
marshmallows
coconut

1. First poke all your potatoes with a fork and pop them into the microwave. I have a "baked potato" setting that I just push and let my microwave do all the work. But, if your microwave doesn't have that setting, just cook them on high for 5 minutes. Test them to see if they are soft all the way through. If the are still hard, just add on a minute at a time until they are done. I usually do this a couple hours ahead of time so they have time to cool. It is NOT fun to peel the skin off of a burning hot potato.
2. After your potatoes have cooled, peel them and put them into a bowl. Use a potato masher and mash them until they are creamy. Next add in your butter, salt, cinnamon, and brown sugar. Mix it all together and scoop into a casserole dish.
3. Preheat your oven to 425. Right before you put your dish in the oven, sprinkle some marshmallows and coconut right on top. As much as you want :)
4. Bake for 15 minutes until warm. Then broil for just a minute or 2 until your marshmallows and coconut are golden brown. Eat and enjoy!

* This can be made a couple of hours ahead of time and kept in the fridge.


Tuesday, May 22, 2012

Banana Bread Cookies

My mom used to make these cookies for me when I was a kid. When I would have sleepovers she would make a big batch and all us girls would snack on them all night. They are a healthy cookie so I don't feel bad letting my kids have 2-3 :) They really taste like little banana bread bites, so good!


Ingredients:

1 1/4 cup sugar
2/3 cup applesauce
2 tablespoons vegetable oil
1/2 cup egg beaters or 3 egg whites
1 cup mashed bananas (about 3)
1 teaspoon vanilla
3 cups flour
 2 teaspoons baking powder
1/2 teaspoon baking soda
1/2 teaspoon salt
cinnamon and sugar mix

1. Mix sugar, applesauce, oil, eggs, banana, and vanilla. Add in the flour, baking soda, baking powder, and salt. Mix until all combined. The dough will be super soft. Kinda like banana bread. Put the whole bowl in the fridge for 30 minutes. Or be like me and stick it in the freezer for 15 minutes so you can eat them sooner :)
2. After they have been chilled preheat your oven to 400 and use a cookie scoop and scoop out 12 per cookie sheet. Sprinkle the tops with cinnamon sugar and bake for 8 minutes. As soon as they are done remove them and place on cooling racks. Then EAT! They are nice and fluffy. So good! Now you could add chocolate chips, walnuts, or a sweet glaze.

Nice and fluffy

                         Really cute babies like snacking on them, yum!

Wednesday, May 16, 2012

Italian Grilled Cheese

This is a really yummy way to make grilled cheese. There are so many variations for this sandwhich but I LOVE this flavor combonation. This dinner is simple but very satisfing!


Ingredients:  (make for as many sandwichies as you like!)

bread (homemade if possible, so good!)
sliced mozzeralla cheese
sliced tomato
fresh chopped basil

1.  I use homemade bread for this dinner. The bread is so fluffy and gives this sandwhich such great flavor. But a great storebought sourdough would be delicous. Just butter both outsides of your bread and place cheese on the inside. Sprinkle with basil and put it on the hot pan. Give it a few minutes and flip it!

Now we do this a bit different. I grill the sandwhich with just cheese first. As SOON as I take the sandwhich off the heat, I quickly open the sandwhich and place the tomoato slices on one side of the bread and then close it.  This way there is cheese on both sides and you don't have tomaotes falling out when you flip it.

2. So easy! Add some fruit and veggies and dinner is served!

Monday, May 7, 2012

Mandarin Chicken Salad with Poppy Seed Dressing

You might know that I love salads. Love them. Thank goodness my husband does too so.... we religiously have salad night every Friday. I look forward to this night. That might seem weird but it is true. I love when the weather warms up and there is lots of yummy fruits and veggies available and that means delicious salads will be created. This salad is fresh and crisp! I found a recipe and tweaked it a bit and it is perfect. The dressing really adds tons of flavor. Add toasted and buttered ciabatta or french bread and dinner is served!


Ingredients: (this made 2 adult size dinner salads)
 
1/2-1 head Romaine lettuce, chopped
1/2 thinly sliced medium red onion (optional, my husband isn't a huge fan of raw onion)
1 large avocado, cubed
4-6 pieces of turkey bacon, cooked and chopped
1 large can Mandarin oranges, drained
4 chicken breast tenders or 2 chicken breasts, thawed
salt
pepper
garlic granules
 
Dressing:
1/3 cup white vinegar
1 teaspoon Kosher salt
A few turns of freshly ground black pepper
3/4 cup sugar
1 teaspoon spicy mustard
1 green onion, chopped
1/4 cup fat free Italian dressing
1 teaspoon poppy seeds
 
1. Put your lettuce on your plates. As much as you like. We like big salads for dinner so we put a good amount of lettuce on our plates. Right on top add your onion, avocado, turkey bacon and oranges. Next it is time to cook your chicken.
2. Season your chicken with salt, pepper and garlic granules. Cook in a skillet or on the grill until done. Let cool for a few minutes so when your cut into it, the chicken will still be juicy. Slice and top your salad with the chicken.
3. Ok, dressing time. This is really easy and quick because you toss it all in the blender! Combine vinegar, salt, pepper, sugar, and mustard in your blender. Blend. While the blender is running, add the green onion. Continue running the blender and add the Italian dressing in a steady stream until it is fully incorporated into the dressing. Pour into a serving container and stir in your poppy seeds. Top each salad with as much dressing as you like.
Enjoy a yummy spring salad.
 
adapted from our best bites