Wednesday, November 30, 2011

Homemade Tortillas

There is nothing.... I repeat nothing better than a warm homemade tortilla. Seriously, I could just eat a stack of these babies for dinner but I am nice and shared with the rest of my family. These are incredible. They will change the way you look at tortillas forever. Try them, you will love them. Promise!


Ingredients:

2 cups of all-purpose flour
1 1/2 teaspoons of baking powder
1 teaspoon of salt
2 teaspoons of vegetable oil
3/4 cups of warm fat free milk

Directions:

1. Mix together the flour, baking powder, salt and oil in a large bowl. (I used my stand mixer)
2. Slowly add the warm milk. Stir until a loose, sticky ball is formed. Knead your dough for two minutes on a floured surface or in your mixer. The dough should be firm and soft.
3. Place your dough in a greased bowl and cover with a damp cloth or plastic wrap for 20 minutes.
4. After the dough has rested, break off 8-12 sections, roll them into balls in your hands, place on a plate (make sure they aren’t touching) and then cover balls with damp cloth or plastic wrap for 10 minutes. (It’s very important to let the dough rest, otherwise it will be like elastic and won’t roll out to a proper thickness and shape.)
5. After the dough has rested, one at a time place a dough ball on a floured surface, pat it out into a four-inch circle, and then roll with a rolling pin from the center until it’s thin and about eight inches in diameter. Don’t over work the dough, or it’ll be stiff. Keep rolled-out tortillas covered until ready to cook.
6. In a dry iron skillet or I used my electric skilled (usually used for pancakes)heated on high, cook the tortilla about thirty seconds on each side. It should start to puff a bit when it’s done.
7. Keep your cooked tortillas covered wrapped in a napkin until ready to eat. Eat them when they are warm..... so good!

* Have these with fajitas, soup, on the side with taco salad, or sprinkle with cinnamon sugar for a sweet treat!

Thursday, November 17, 2011

Taco Soup

Here is another wonderful, healthy, warm soup for you this fall. I started making this when I was first married and it has been a keeper! This recipe is made with ground turkey but you could use shredded chicken or an extra can of beans to make it a vegetarian meal. Anyway you go it is spicy and wonderful!!


Ingredients:

1 lb. ground turkey (or cooked shredded chicken)
1/2 onion, chopped
1 can sweet corn, undrained
1 can kidney beans, undrained
2 (15oz.) cans diced tomatoes, undrained
1 can diced green chilies
1 package taco seasoning
grated cheese
sour cream
chopped cilantro
chopped tomatoes
warm tortillas (homemade recipe is next!)

1. This is the easiest soup....ever. In a big soup pot heat to medium/high heat and cook your onions until they start to become translucent. Add in your ground turkey and brown until cooked through. Add your seasoning packet and to the meat and onions. Give that a stir and open ALL those cans.
2. One by one add your canned veggies and beans. Now if you want to go vegetarian add another can of kidney beans or a can of black beans. Also, if you are using chicken add that now. Allow your soup to come to a simmer to combine all the flavors. Turn it to low and keep warm until dinner.
3. If your soup gets a bit thick, just thin it out with a bit of water. When it is time to dish up you can add cheese, sour cream, diced tomatoes, chopped cilantro, crushed chips.....OK you can add a ton of stuff to really spice this soup up!

* Serve with tortillas on the side or corn chips. I made homemade tortillas that were amazing!! I seriously could have eaten those and been completely satisfied.... but the soup is good too!!
* Tortillas are the next post!

Saturday, November 12, 2011

Mini Pumpkin Cheesecakes

Oh my, these were soooo good! I have said before that I love cheesecake. I love mini cheesecakes because they cook fast and they are the perfect size. Well these cheesecakes were perfect! The sweet creamy pumpkin was the perfect fall treat. This recipe is from Our Best Bites and everything they make is fabulous! I altered it a bit to cut back on fat and calories but wonderful just the same!


Ingredients:

24 low-fat nilla wafers
1 cup white chocolate chips
3 packages low fat cream cheese
1 cup sugar
3/4 cup egg beaters
3/4 cup pumpkin
2 teaspoons vanilla
1/4 teaspoon nutmeg
1 1/2 teaspoons cinnamon
1/8 teaspoon cloves
whipped cream

1. Preheat oven to 350. Line 2 muffin tins with cupcake liners and place a nilla wafer in the bottom of each cup.
2. Melt your white chocolate chips in a bowl in the microwave for 30 seconds at a time until smooth. Set aside.
3. With an electric mixer, beat your cream cheese and sugar until smooth. Add in your egg beaters. Then mix in the pumpkin, vanilla, nutmeg, cinnamon and cloves. With the mixer running, slowly and steadily add in the melted whit chocolate in a stream.
4. Using a ladle or measuring cup fill your muffin tins 3/4 way full and place in oven. Bake for 20-25 minutes until center is just set.
5. Cool your cheesecakes for an hour at room temperature and then keep in the fridge until you are ready to eat.
6. When you are ready to serve top with a bit of whipped topping and dig in!!

* You could replace the nilla wafer for a ginger snap cookie if you want, yum!!

Tuesday, November 8, 2011

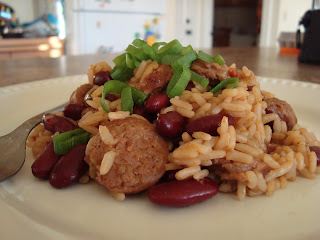
Red Beans and Rice with Turkey Sausage

This is comfort food. Yum. This meal is sooo quick to put together. Seriously, incredibly fast. In the time it takes to make this meal you can bake up some muffins and toss a salad or steam veggies and walla......dinner is ready! This is a great fall meal to warm cold bellies.


Ingredients:

1 box (8oz) dirty rice mix
2 1/2 cups water
2-3 turkey sausage links (the spicy kind are great!)
1 can kidney beans, drained and rinsed
1 large green onion, sliced

1. Get those sausages cooking. In a non-stick skillet, cook your sausages until cooked through. They can be cooking while you get your rice ready, which is next.
2. Ok, super easy here. In a 2 quart sauce pan heat rice and sauce mix and water until boiling. Reduce the heat to medium low. Cover and cook about 25 minutes. Stir every once and a while so rice isn't sticking to the bottom of your pan. Whenever your sausages are done cooking you can slice them up and add them in to the simmering rice to all the flavors blend.
3. When rice is tender go ahead and add your beans. Stir them in and cook about 1 minute until warmed through. Take your pan off the heat and let stand about 5 minutes. Fluff the rice and give everyone a nice big spoonful. Garnish with green onion.

* Corn bread or muffins would be great. A green salad or steamed green beans, broccoli, or roasted asparagus are all good veggies to have with this meal.

Thursday, November 3, 2011

Cheesy Stuffed Chicken

This meal was so delicious! My husband kept making mmmmmmm sounds. I'll take that as a good sign :)

I love chicken. It is so versatile and low in fat and calories. But, sometimes it can be bland if it's not spiced up just right. This meal is a great way to get out of your boring chicken routine. It looks so fancy but was really easy to make and would be perfect for entertaining. Seriously make this, you will love it!


Ingredients:

6 chicken tenders, pounded flat and thin
3/4 cup fat free ricotta cheese
1/4 cup sun dried tomatoes, finely chopped
1 garlic clove, minced
1/4 cup chopped fresh basil
salt
pepper
Italian seasoning

1. Heat your oven to 425 degrees. In a small bowl stir together the ricotta, basil, sun-dried tomatoes, and garlic until creamy and combined. Add a couple shakes of salt and grind some pepper in there too. Mix and set aside.
2. Line a cookie sheet with foil and spray with non-stick spray. On a cutting board, place your chicken that has been pounded flat. Using a spoon scoop out some ricotta filling and place in the middle of your chicken. (Remember you are stuffing 6 chicken tenders, so you can divide your mixture into 6 portions so they are the same)
Ok, now fold one half of the chicken over the mixture and then roll the chicken to seal the mixture in. Now, at this point you can use a toothpick to keep it closed, but I just picked mine up and placed it on the cookie sheet seam side down and it worked perfect. Do the same to the rest of your chicken and put on the cookie sheet.
3. Sprinkle each chicken with a bit of salt and Italian seasoning. Drizzle a little olive oil over the top and pop it into the oven.
4. Bake for 20-25 minutes until the tops are golden.

* Serve this meal with steamed carrots, broccoli, or green beans. A nice green salad would be nice, and some rolls or garlic bread.